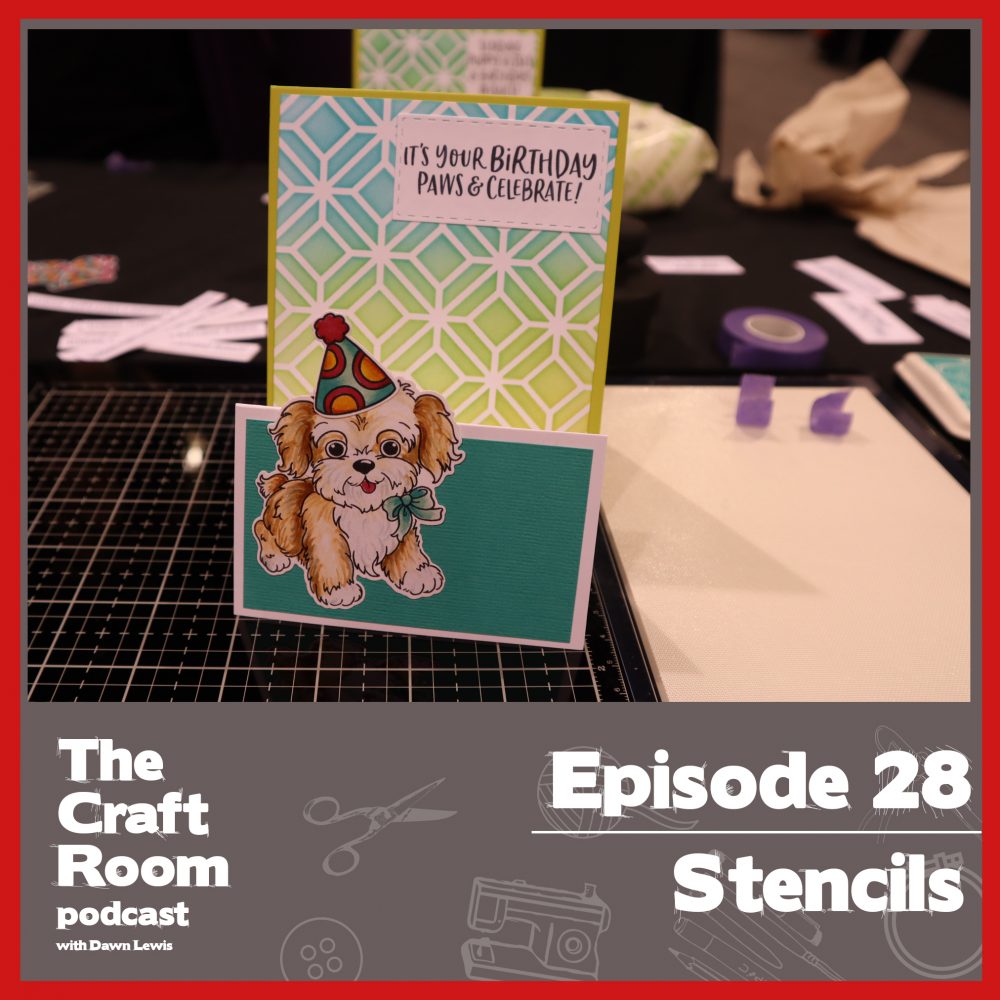
I know it’s been a while between episodes, but Covid and lockdown have kept me extra busy with the shop. I’m excited to be back … thanks for tuning in! Today, let’s talk about one of the oldest, most used, versatile and affordable pieces of kit that you can have in your crafting stash – stencils.
Stencils are, essentially, a tool that helps you create a design quickly and easily by masking off the areas where you don’t want to apply your ink, paint or medium. There are lots of different sizes, shapes and types of stencils. You can buy them or make them, and there are a few different materials that are commonly used. These days, commercial crafting stencils are a thin flexible plastic, but you can make your own using specialty stencil plastic, acetate, a fused laminator pouch, cardboard or paper. You can cut them by hand or use a die-cutting machine using your dies, or a more sophisticated electronic cutting machine like the Scan N Cut, where you could scan any print or hand-drawn image then cut. Alternatively you could use a machine like the Silhouette or Cricut using an SVG file (and I will link to my favourite SVG file resource in the show notes). When creating your own stencil the most important thing to remember is that the openings of the design need to be bridged. There can’t be any loose pieces … the whole thing needs to be joined as one piece.
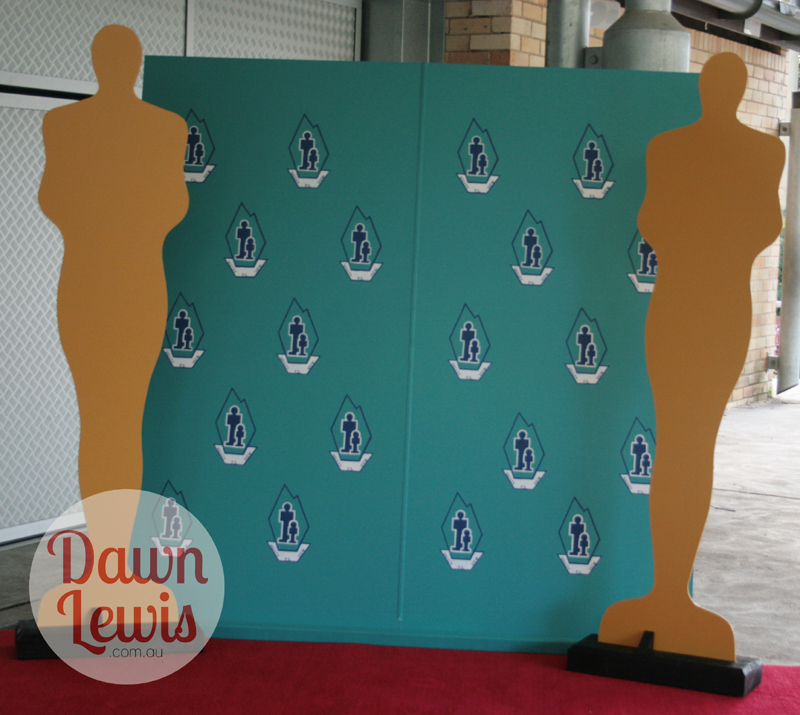
My current preference for stencils are the thin plastic commercial ones. They are flexible, so I can use them on a curved surface (like a candle), yet they’re extremely durable. On occasions where I have cut my own stencils in recent years, I’ve used acetate. It’s durable enough to complete the project, though after a couple of dozen uses, it is usually not suitable to be used again. It’s single-use in the sense that I can only use it for one project, even if I use that stencil many times in the making of that project. The biggest project I ever did with an acetate stencil (in fact, it was 2 layering stencils, before layering stencils were cool), was a large “sponsor board” for my daughter’s year 6 farewell. They had a Hollywood theme, and I was on the decorating committee … and we thought it would be fun to have the school emblem on a sponsor board, just like at a red carpet event. All the kids were photographed with their custom background, and last I heard the school was still using it. You understand why I used a stencil … right?! At the time the only option I had was hand-cutting from acetate, but if I were doing it now, I’d definitely use a Scan N Cut!
Cardboard or paper stencils are easy to cut, and cheap, but they really only have a short life-span, and are more suited to projects where you are using spray-paint or tracing lightly. Because of the porous nature of cardstock and paper, eventually any paint, ink or medium you use over the top will begin to bleed through, therefore no longer providing the masking effect that makes a stencil do its job efficiently.
Today I’m going to concentrate on different types of crafts and surfaces suitable for stencilling projects, some fun mediums you can apply over stencils and the five most amazing advances I’ve seen in stencils in recent years. We’ll also discuss some accessories and tools that can improve your stencilling experience.
SURFACES
Let’s start with surfaces, and while I will admit that I haven’t done a deep dive into the history of stencils, I imagine that one of the first uses was to create a feature wall. Imagine you want to create a feature wall, which means painting an even design from top to bottom left to right. Doing that by hand would be incredibly time consuming and almost impossible to achieve uniformity in the design. But, by using a large stencil, you could easily apply an even and uniform design all the way over the wall.
Another popular place to use stencils is in papercrafting. Scrapbooking, card making, art journals … stencils are popular for creating custom backgrounds in each of these. When I was scrapbooking I used stencils quite often, for a variety of different effects. I used mini alphabet stencils for journal spot titles. My handwriting is legible, but by no means beautiful or even artsy. Sure, I had a few alphabet stamp and die sets, but they were quite expensive back then, and sometimes a girl needs some variety in her layouts! I sometimes used stencils for paper piecing, and other times I would use them to create borders or backgrounds. These days in my card making I mostly use stencils for backgrounds, and although I’ve yet to explore the world of art journaling, I have watched other people use them to create gorgeous mixed media pages.
On the subject of paper … planners and journals are a great place to use stencils. There are some amazing mini stencils for just this purpose, and I’ll link to a couple of my favourites. Until a couple of years ago I thought a diary was just a book calendar, nothing more than a place to jot down appointments and to-do lists. However, since I started stocking planner stamps, exhibited at the Sydney Planner Markets and joined a Facebook planner group, my eyes have been opened to the new way of planning. They are being used to track memories and express creativity … it’s like a hybrid form of scrapbooking, but smaller. I will link to the planner section of my shop in the show notes, and one of my favourite planner stencil stores.
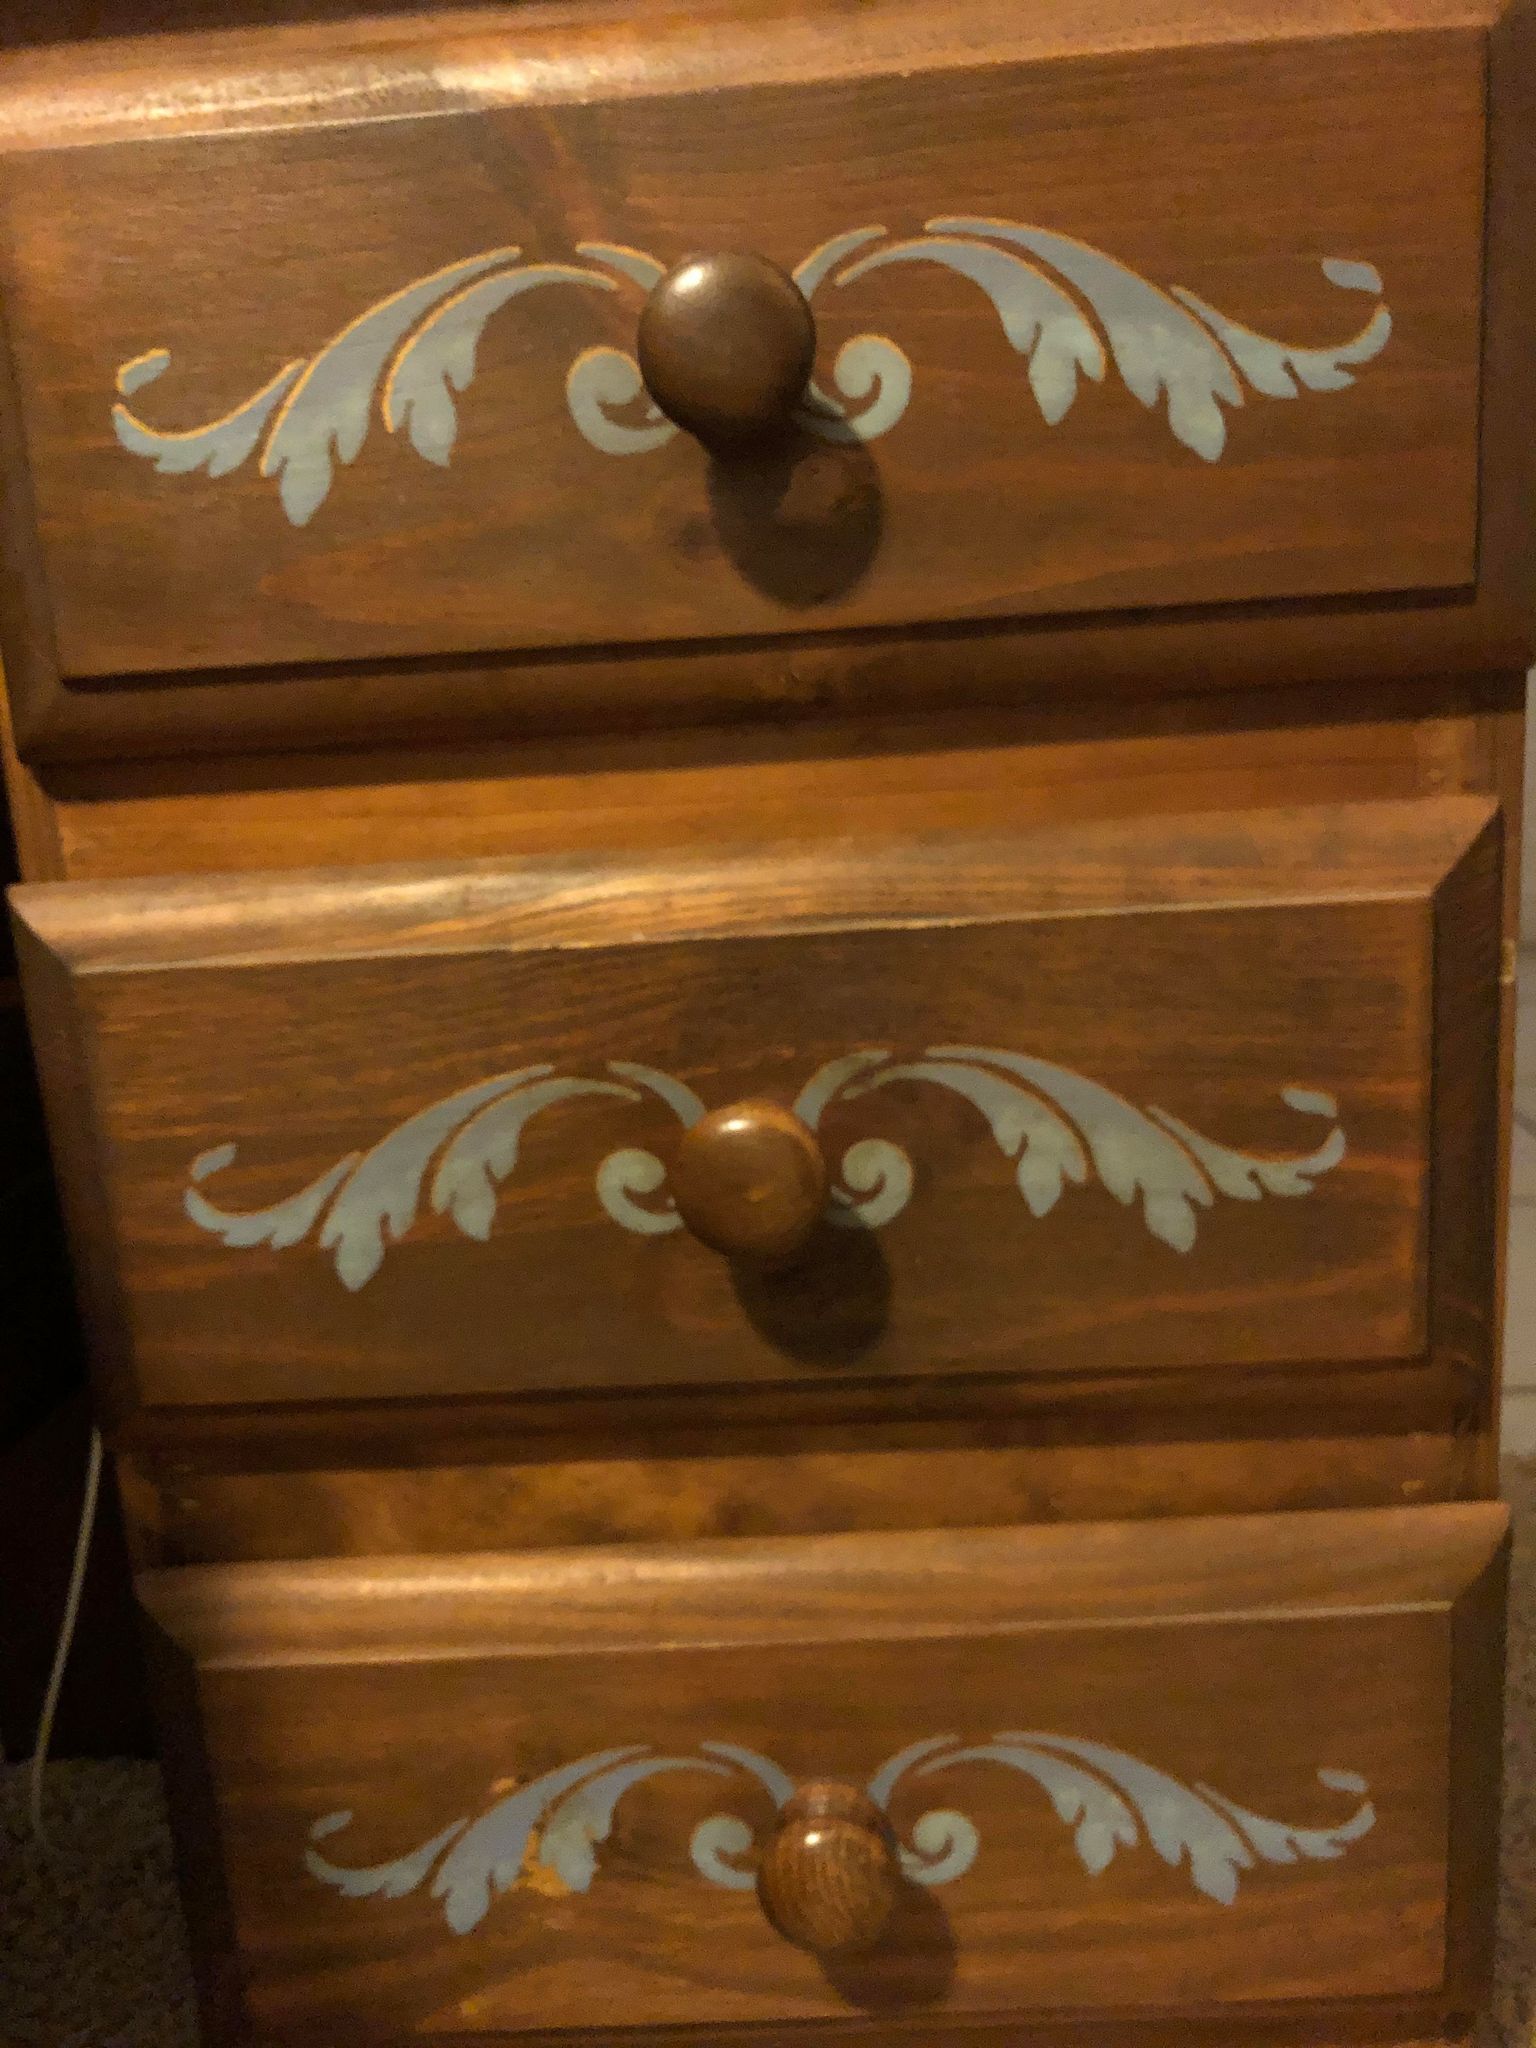
Many years ago, when I was about to move out of home, I purchased some pine furniture. The trend at the time was to simply stain and varnish them, but I wanted to add a personal touch. I stencilled a flourish design across the front of the drawers with 2 tones of blue paint and added a gold highlight to the design. I still have those bedside tables and I still think they look pretty good.
You can use a stencil to create a quick design on fabric, like clothing, cushion covers, and just plain fabric. The best example of this is screen printing, but a regular stencil will also do the job. If you want an outfit or home decor that nobody else has, why not make your own custom fabric?! I have fond memories of my Mum doing simple screen printing in the 80’s using wax paper, until she upgraded to a Print Gocco screen printing machine. That was fun!
You can also use stencils in your embroidery if you want to put down a repeat pattern. Let’s say you are making multiples for gifts or an item that you sell frequently. One of my favorites is to use an alphabet stencil to trace around a letter, creating a monogram, then fill in the area outside of the lines densely, working out to stitches spaced further apart as they taper off. It’s difficult to describe, so I’ll link to an example in the show notes.
Let’s not forget about home decor. More than just fabric and walls, you can use stencils to create signage, be it country style on pine, or modern chic on reclaimed wood. Forget the perfect sign-writing skills that take years to master … a stencil can help you create something special for your own home, or for a gift. You can also use it to create fun multi-media artwork on a canvas.
Probably the most surprising place I’ve seen stencils used is in the kitchen, but I can’t argue with the results … they’re amazing! Use a stencil to create a beautiful design with icing around a cake. I have seen cookie makers on TikTok use stencils to assist them in their intricate designs, and I’ll link to a quick video in the show notes … you need to see it to believe it!
MEDIUMS
These days commercial stencils come in all different shapes and sizes, from mini to A4 or even A3 in size. And with the growing popularity of slimline cards, there are more different shapes and sizes and styles of stencils. There are so many different mediums that you can use over stencils, so let’s dive into those.
Inks
Let’s start with inks, and when I say inks, there are a few different kinds. So let’s talk first about ink sprays. Dylusions by Ranger are a fantastic ink spray. The colors are vibrant, and the ink is very thin and watery, so it sprays really well. The closer you get to your project the more solid the coverage, but if you spray from further away, the ink is more spread out, for more of a fine spatter finish. One of the coolest things I saw someone do in their art journal when spritzing spray ink over a stencil on one page, was to then pick up that stencil (covered in ink) and turn it upside down and apply it to the opposite page. The genius of this is that you end up with two designs from one application. Use the positive on one project and the negative on another, and don’t waste that ink. And while ink sprays are loads of fun, bright and colourful, I do offer this word of caution … they are messy and that ink will stain everything! So unless you enjoy having stained fingertips, perhaps some disposable gloves are good to keep with those inks so you remember to use them. Also, because of their liquid nature, there’s usually a lot of overspray. I am still finding tiny red dots on my papercrafting desk after my first adventure with Dylusions spray ink. I recommend grabbing a cardboard box, perhaps something an order has arrived in, or pick one up at Aldi or Bunnings. Place your project in the box and spray into that, or at least take it outside and spray over the grass. You do not want to get a permanent ink all over that heirloom tablecloth, your brand new dining table or the lovely clothes that you’re wearing.
The next type of ink … is ink pads. Ink blending is probably the most popular use for stencils in the card making community. You can apply Distress Inks (regular and oxide), dye inks, pigment inks or hybrid inks over stencils for different effects, and with a variety of different tools. There are some great blending brushes on the market, in all different shapes and sizes. You can even use makeup brushes to do this. In fact, a lot of the blending brushes on the market started their life as a makeup brush, and I’ll link to a great video comparing the two. Using your ink pads with stencils is a great way to stretch those supplies and get more bang for your buck. The same stencil can look completely different with a fresh colour combination or texture finish. There are some amazing techniques using ink pads with stencils, which we will get into shortly.
Paint
There are a few different ways that you can apply paint over a stencil. It will depend a little on the surface you’re working on and the type of paint. Your stencil design may also help decide which type of applicator you’ll need to use.
If you’re using an acrylic paint or wall paint, you could use a mini sponge roller. If the stencil is very fine, like really intricate detail, and you’re using a paint roller, it’s possible that the paint is going to pick up the edges or fine details of the stencil and it’s going to get underneath. So you want to be gentle with super intricate designs, and perhaps use a smaller, gentler applicator, like a stippling brush. But if it’s just like a circle or something that’s quite plain, you can use a little paint roller without too much worry.
You can use spray paint (like a can that you shake up graffiti style) with a stencil (that’s how icons like parents with prams or disability spaces are marked in parking areas). However, be aware that if you get spray paint on your stencil, chances are that you won’t be able to clean that off. If the stencil is for single use, or single project use, and you need to cover a large area fast, absolutely go for it. This is where a cardboard stencil can shine.
There is a different type of spray paint … it’s a much smaller container, it’s a pump spray … very similar to the spray inks. The difference is the consistency, and it pays to read reviews on them, as well as paying close attention to the instructions so that the paint doesn’t dry in the nozzle, rendering it useless. That would be used for smaller craft projects.
One of my favourite techniques for creating a feature wall is to use tone-on-tone, but change up the type of paint to show the stencilled design. For example, you could paint the wall black (yes, I know that’s dramatic, but hear me out!) … using a matt finish paint. Once it’s dry, you can put your stencil in place, then paint over that with black gloss finish paint. It’s my dream to do this with a large damask stencil, because the end result would be gorgeously gothic and sophisticated. Sure, you can create great geometric finishes on walls with painters tape (which has been a huge lockdown trend on TikTok), but the time needed to place all that tape on the wall is significant, and a stencil helps cut that time down. You may need to measure and mark some points for the stencil so it lines up straight, but the end result would be well worth the effort.
TECHNIQUES
Offset
I’ve talked before about offset stamping, but off-set techniques also apply to stencils, and look particularly awesome with ink blending. You start by placing your stencil on your cardstock and blending your first ink colour over the stencil, and then you shift it. Just move the stencil a tiny bit to the left and down, or to the right and up, and then ink again with a contrasting colour. When you do this with red and blue you have that old school 3D glasses effect, but you can do it with any colours. The two colours give the illusion of three, and it changes up the look, yet again, from that same old stencil.
Embossing
Speaking of embossing, that is a very cool way that you can use your stencils and there are two different kinds of embossing I’m going to talk about the first is heat embossing.
Lay down your cardstock, put your stencil in place, then apply your VersaMark or any clear sticky ink (even a pigment ink) straight from the ink pad, or use a blending tool or brush. Lift the stencil away, apply your embossing powder, heat it with your heat tool, and you have a beautiful metallic or iridescent or glitter or glossy design. You could do tone-on-tone with white cardstock and white embossing powder (like a very small scale version of my dream feature wall!). The benefit of using an ink like Versamark is that when you apply it to a dark cardstock, it creates a slightly darker tone of the same colour where it is applied. But, of course, you can use any embossing powder that you have, and suddenly you have a very different look from the same old stencil.
Now let’s talk raised embossing and there are a few ways that you can do this. You could use the mouse pad and stylus technique with a light hand, or you can run it through your die-cutting machine with an embossing mat. There’s actually a lot I’d like to talk about when it comes to embossing, so I think that’s going to be an episode all on its own.
Trace the shape
My earliest memory of using a stencil was a really, really thick, hard plastic stencil that my Dad had in his office which had the alphabet, numbers and punctuation. I used to use that stencil to create title pages in my school books. It probably comes as no surprise to anyone that I was a huge nerd, and doing title pages was my favourite part of going back to school.
That simple method of tracking around a stencil can be taken to some new levels. Sure, you can use a nice fine liner, and colour it in solid, but you can also doodle some zentangle designs in there without a line, which is a very cool effect. Add dots or cross-hatches and mix it up. Use different types of markers like a Versamark pen or metallic marker, but be aware of how the marker reacts with the paper to avoid excessive bleeding.
Stamp over the stencil
Another fun technique is to stamp over a stencil. Most craft stencils these days are quite thin, thankfully, because stamping over a stencil really only works if you’re working with a thin stencil. For example, that thick, hard plastic stencils that I used to use when I was a kid. That would not work here because the stamp needs to be able to touch the cardstock through the opening so you need quite a fine, thin plastic stencil for this technique. Sure, paper or cardstock stencils would work here as well, but they won’t hold up as well over time. So let’s say you’re using a simple circle stencil, and you want to create a highlight spot with a design only in that circle. You can place your stencil down, maybe do a little ink blending, and then you can stamp over the top of it with a fun text, image or background stamp. Of course, you don’t have to do the ink blending first, you can just stamp for a fun shape. Alternatively you could use it for a spotlight effect. Stamp, lay down your stencil shape over the top and only colour within that shape area. It’s just another way to stretch it and get more value from your stencils.
Layering
Try layering one stencil over another stencil. Start by applying your ink or paint over one stencil, let it dry, and then lay down a different stencil and apply the same, or a different, colour.This creates a really interesting look, and you’ve stretched the use of your stencils yet again.
Jac Paper & glitter
Jac paper is a double sided adhesive with release paper on both sides. Remove one side of the release paper and stick it down to your cardstock. Then trace through a stencil onto the top layer of release paper and use a craft knife and a light hand to cut through that paper. Peel that section away, apply your glitter and tap off the excess. Then you can peel away the rest of the release paper, apply a different glitter colour, and have a single layer two tone glitter effect. It’s messy, but it’s also shiny and pretty.
Gel press
Oh man, I love a gel press. I have a large gel press, which I never use it (mostly because I can’t remember where I put it). So, I’ve ordered myself a smaller 6” x 6” gel press. Working with a Gel Press is so much fun … it’s essentially a thick block of clear silicone, great for creating one-off designs. You can use inks, you can use paints, paint mediums, all sorts of tools. You guessed it … one of the fun ways to get designs, texture and interest into your monoprints using a gel press is with stencils. Apply your paint and ink, lay down a stencil, lay down your paper and pull a print … and then you can remove the stencil and pull another print on another piece of paper. Of course you can use your stamps, and texture plates and all sorts of tools … which makes me think that maybe we should go a little more indepth about Gel Plates another time!
Ink lift techniques
A fun way to create interest with your Distress Inks (or any other water reactive ink pad) and stencils includes something as simple as a baby wipe with this lift technique. Ink up your cardstock with ink and let it dry (either naturally or use your heat tool). Place your stencil on top of the inked surface, then apply the baby wipe or damp cloth with a gentle pressing motion over the open areas of the stencil. Alternatively you could spritz over the stencil with a mist of water (or a pearlised water, which you can make by adding a little Perfect Pearls to water in a spray bottle), then use a dry cloth to dab the moisture away. Water reactive inks will lift away with the cloth, and when you remove the stencil you will see the design in a paler colour than the background..
Texture Paste
I have used texture paste for painted projects, but I remember using it for a faux metal embellishment with a stencil, and it was very successful. When I first started scrapbooking, metal embellishments were gorgeous, but were quite expensive. So I played with stencils and texture paste and embossing powder to see if I could get that faux metal look … and I did! To do this, simply apply the texture medium over your stencil onto thick cardstock with a palette knife or scraper. Note that the thickness of your stencil is going to be a good indicator at how thick your raised area is going to be. But even if your stencil is quite thin, you can apply the paste heavily, and when you pull the stencil away it will leave a nice raised area. It is important to let the texture paste dry fully, and I prefer to let mine dry overnight rather than using a heat tool (as the paste can sometimes bubble up, and this needs to be a nice level surface). When the texture paste is dry, apply a clear sticky embossing ink over the entire piece, pour over your silver or gold embossing powder, heat, and repeat that 2-3 times. Voila … faux metal raised embossed embellishment! You can also use texture paste on it’s own, with glitter embossing powder, or tinted with paint or ink.
Deco Foil medium
There are a few different types of foils, some need toner, and some need heat and/or pressure. For the deco foils & flocks, you can use Deco Foil Transfer Gel Duo. And one of the ways you can apply this gel medium is through a stencil! Use a palette knife or scraper to apply the gel medium, lift the stencil away, scrape off the excess (put it back in the jar to use later), then let the stenciled gel dry (it will shift from white to clear). From there, simply place your foil over the top (pretty side up), place it into a folded piece of baking paper with an extra piece of cardstock and run it through a laminator. Alternatively, you can use pressure by running it through your die-cutting machine.
Glitter Gel / Paste
At Creativation this year I got to play with the new Ranger Stickles Glitter Gels using a stenciling technique. It was incredibly simple … simply apply over the stencil, lift the stencil away and let it dry (we used a heat tool to speed that up). The gel is clear, and the glitter is dense, but it doesn’t come off on your hands because it’s trapped in the dried gel. Stunning results!
White Pigment Ink
Jennifer McGuire does an amazing technique over inked surfaces using a stencil and white pigment ink. I strongly recommend the Hero Arts ‘Unicorn White Pigment’ ink pad for this technique. It is a beautiful, strong bright white ink and does a great job. Instead of putting a darker colour through the stencil, you start with a dark colour, then apply the white ink through the stencil for a reverse look. You can even ombre it from strong at the bottom to less intense at the top (or vice versa).
CLEANING
It’s important to make sure you clean your stencils almost immediately after using them. You do not want texture medium or paint drying on that stencil … I learned that the hard way! If I’m using stencils with any kind of medium I have to apply with a palette knife, roller or paint brush, I have a small tub of water next to me. That way, when I’m done working with that stencil I can drop it into the tub so the paint doesn’t dry on them, and clean them all later. You can wipe stencils clean using a baby wipe, or spritz with water and wipe with a microfiber cloth. Alternatively a soft baby nail brush is an ideal tool for giving them a clean without causing any damage to a very intricate stencil. Why am I insisting that you clean them quickly to keep them in good condition? Well, that’s because if you let ink, paint or mediums dry in the openings, then the next time you go to use it, it’s not going to give you the crisp design that you expect from that stencil.
TOOLS & ACCESSORIES
While stencilling is quite a simple process, there are a few things that can make this whole stenciling business a little bit easier. One of my main problems with stencils is their slippery nature. It’s so frustrating when they move about and the design ends up crooked. Or, you put all this effort into a great blend, then the stencil moves and then the ink, paint or medium gets in the wrong place. Thankfully there are a few fantastic products that help keep your stencil where it needs to be.
Pixie Spray
The first one is Pixie spray. This is an aerosol spray low tack adhesive. You might remember we talked about adhesives back in episode 26, though I don’t remember if I mentioned Pixie Spray. This is ideal for stencils with dainty, intricate designs, and lots of slender little pieces that might easily move about when pushed by a blending brush or lift as a roller full of thick paint rolls over the top. You spray this adhesive on the back of your stencil, let it dry to a tacky finish, then you’re ready to lay your stencil down on your surface and get to work. It’s sticky enough to hold still while you work, yet not so sticky that it will damage your surface when you peel it away. I would recommend spraying this in your overspray box, or outside, and if it’s a windy day, wear a mask (you do not want to be breathing in glue!). I’m often asked if I stock Pixie Spray, and the answer is … unfortunately, not, 99.9% of my orders are sent by post and aerosol sprays can’t be sent via Australia Post. This is one of those items that it’s best to pick up at your local craft store. But you know one day someone will bring out a pump version and then I’ll be all over that.
Low Tack Tape
The next is a low tack tape. You may not need to put a spray adhesive on the back to hold the entire stencil down, but you may want to stop it sliding about … that’s where low tack tape comes in. There are some specific tapes that you can get from thermoweb icraft, including a narrow and a wide purple tape that are very, very popular but washi tape or painters tape also work well.What I like to do is put the stencil the right side down, place my cardstock on the top, tape it from the back and then the if your stencil and card stock are going to move, they’re moving together!
Tools
We also need to talk about ink blending tools, because these days there’s a lot of variety! For stencils that aren’t too detailed or when I want heavy ink coverage, I like to use the Ranger Tim Holtz Mini Distress Ink Tool with the foam pads. I like the fact that the foam pads attach with velcro, are relatively inexpensive and refill packs can be purchased. I also like that they store very neatly underneath my ink cubes, and I have one for each colour of my mini Distress Inks. Yes, I have the original, larger ink blending tool, but I find the mini round tool applies ink better, with less grungy bits.
Scraper
And the last is a palette knife. Now you can get a little proper little mini painter palette knife, and there are also scrapers that you can buy. But you could, instead, use an old gift card (like an iTunes card). I mean … you’ve already claimed it … what are you going to do with that piece of plastic? Throw it in the bin? No, put it in your craft toolbox. It’s now a scraper for texture mediums, glitter gels or paint.
That’s one of the beauties of stencilling … you don’t have to spend a fortune, you get loads of variety, and it’s quite simple to do!
TOP 5 NEW STENCIL TYPES
Now let’s talk about five of the most amazing new kinds of stencils that have hit the market in the last few years that are total game changers.
Shifter Stencil
The first one I noticed that was really different was the Tim Holtz shifter stencils. They may look like a regular stencil … they’re long and narrow, they have great designs and the openings are kind of spread out. If you look at the stencils closely (and I will put photos on the blog)you’ll see an embossed section. So, once you’ve inked, sprayed or painted over the stencil, you can wipe it clean, then shift it so that the first layer of inking lines up with the embossed design on the stencil. Now your open areas are perfectly spaced between the already inked design. This means you can get an all over design with a single color or you can use two different colors, because the shifter stencil masks it for you. Genius!
Stencil & Mask Set
My next favorite innovation was stencil and mask sets. I have to admit, for the longest time I have wondered why on earth don’t they give us that fall-out section of the stencil because then you would have a stencil and a mask. Oh, the overwhelming joy when when Altenew released stencil and mask sets to go with select stamp sets. I don’t know if they were the first, but they were the ones that I noticed first. So with the stencil mask set, you have not only the stencil with the cut out holes that are your design, but also the bit that came out of the hole so you can use it as a mask. Let’s take for example the beautiful Tulip stamp set that Altenew has. It’s a delight to stamp and colour, but what if you want to put a softly blended blue sky behind that tulip? Well, in the old days, we would take a sticky note, stamp on that cut it out, put it over the top and then we do our stenciling. Sure that will do the job, but it’s time consuming (especially for very detailed stamps) and if you’re time poor with your crafting, you maybe just can’t be bothered to do that. It can be really fiddly and honestly after a few goes those sticky note masks just lose their stick. You can also get masking paper but again that’s an extra expense and you still have to fuss-cut it. But with the stencil and mask set, you just need a little dot roller temporary adhesive, roll it onto the back of the mask, stick it down over the stamping and coloring you just did, and blend away. The ink is just going to glide over that plastic mask and you can re-use it for years to come with zero fussy cutting. That’s a beautiful beautiful thing.
Layering Stencils
Because not everybody is into colouring, you can now get layering stencils. Layering stamps have been around for a very long time (each stamp is a different layer of the design, you use darker and darker colours, and it looks amazing). Now there are layering stencils, and they give you even more time to line them up just right before you add your ink.I’ll link to a few of my favorites in the in the show notes and over on the blog as well. You can use them with an outline stamp, or without. No Copic Markers required, no watercolors required … you can just use your colored ink pads. So if you’re not into coloring in these layering stencils are their absolute game changer, giving you these beautiful dimensional, almost realistic looking flowers, pinwheels and other incredible designs. They’re so popular they’re just constantly sold out.
Edge stencils
The next one I really am enjoying is edge stencils. It has often baffled me as to why there’s a bit of a design in the middle of a stencil, and yet the edges are all flat. Thank goodness for edging stencils! I will link to some examples in the show notes, but want to give special mention to one of my favourites by Simon Hurley. It’s called the Scene Maker stencil and it has so many elements, both in the centre and around the edge (with masks included!). It utilises the entire stencil so you can create mountains, grass, sun, moon, stars, clouds and birds. Some of my other favourites are by My Favorite Things and Lawn Fawn, and they are specialised, like clouds, grass or hillside. Yes, there are four edges, each with a different profile … great variety! However, if you flip that stencil over, you now have another four perspectives. Imagine you are making a slimline card, and the whole background is clouds … with a critter flying through the air holding a balloon, and you want to do a tall card with all that cloud in the background. You don’t want it to be the same every time, right? So you can shift it left and right. And then you can use a different edge and then you can use a different edge and lift shift that left and right and if you run out, you can flip that stencil upside down and you’ll get a different configuration every time. So essentially, it’s giving you eight options. In a simple four sided stencil. Genius.
Slimline stencils
And the last one that I’m really enjoying are slimline stencils. Slimline cards have definitely taken the card making world by storm in 2020. There are a lot of different sizes, and so many fantastic dies coming out. If you’re wondering “What is a slimline card?”, it’s just a long, narrow card. If you are in Australia like myself, and you want to make one, my preference is to take a sheet of A4 cardstock, trim one third off (which makes a nice mini card), and then fold that remaining two thirds of the cardstock in half. You now have a long narrow card that fits into a DL envelope (which means no extra postage required). Other large card sizes have also gained popularity this year, like 5” x 7”, and 6” x 6” is fun for a big square card. Howevever, they are not standard size, so they cost twice as much to post. US letter sized cardstock is a little different, but most of the dies and stencils translate over to the Australian sized cardstock quite well. To use a regular stencil on a slimline card means lots of moving it about, but the new slimline stencils mean less fussing around. It’s so much easier to do some fantastic borders on a scrapbooking layer.
The last thing I’ll say about stencils is this … there are a LOT available, and there are more being released each month. But you really don’t need hundreds of stencils. Get the ones that you know are going to be versatile. I’m going to say it again … use the rule of three and ask yourself some questions. “Can I think of three different stamp sets I can use this with?”. “Can I think of three different occasions I can use this for?”. “Am I going to get sick of this stencil really fast?”. “Will this stencil date quickly?”. And here’s the thing, if you keep your stencils in good condition, you can always sell them on to someone else. Use that to fund the purchase of a new stencil that’s going to give you a little bit of a change because when you do have the one thing and you use it over and over you do kind of get bored with it. Alternatively, you could gift stencils that you are thoroughly bored with using for the 74th time to a friend who is just getting started with their crafting journey … stencils make great hand-me-downs!
So whether you are working on a wall, a chest of drawers, a card, a layout, making a fun sign from a piece of leftover pine to go in your entryway or getting really creative and unleashing your inner artist, stencils are something that are worth a look. They’re inexpensive, they are versatile, and they don’t take up a lot of space.
LINKS
Creative Fabrica SVG files
Planner goodies
Tia’s Pretty Creations (planner stencils)
Stencils in my shop
Flying animals with Balloons stamp set
Layering Stencils
Shifter Stencils
Edge Stencils
Planner Addicts Australia Facebook group
Pink & Main Blending Brushes
Altenew Blending Brushes
Honey Bee Stamps Blending Brush
i-Crafter, I-Brush mini brushes
The Stamp Market Blending Brushes
Make It By Marko Brush Buddies
Purple low tack tape
Embroidery monogram technique
Hero Arts, Unicorn White pigment ink pad
Cookie stencil TikTok video
Blending Brush comparison video – Mary Polanco
Stencilling technique video – Jennifer McGuire
Gina K Transfer Gel Duo video